Drawing a Skull spins beyond standard art into an exciting enterprise combining creativity with exactness. The human head has complex features and learning skull anatomy lets you create both realistic art and creative designs. To develop your drawing you need to learn both measurements and shading strategies step by step.Those who like cultural designs can use sugar skulls to bring their Halloween artwork and Mexican tradition to life.
People who want to combine art with cultural understanding will find these designs ideal. Starting with the skull structure lets you easily add elements of Halloween motifs.You can begin your Drawing a Skull: A step by step guide by learning its basic shape and size elements. To create the appearance of your design the right shading methods work both for realistic and stylized depictions. Your journey in drawing will improve your abilities while showing you the special task of bringing form and artistic choices together.
STEP 1: Drawing a skull bones make up its overall form
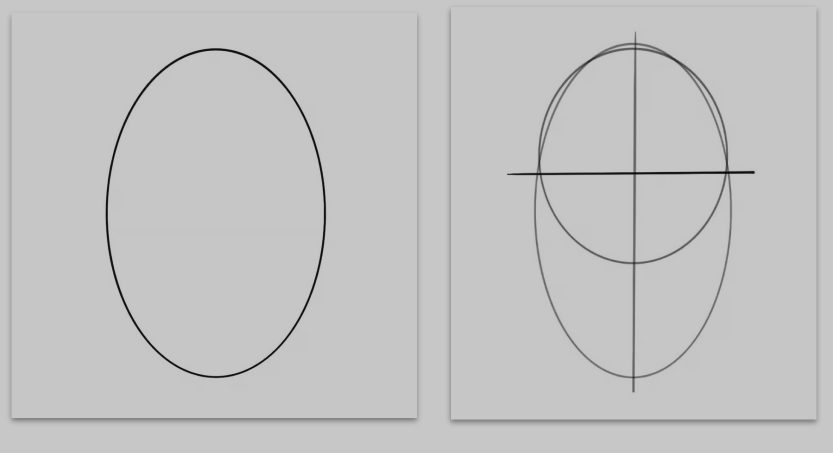
At the start of your drawing a skull A step by step guide you need to carefully plan proportions through basic shapes and measurement lines. Drew a gentle oval first to show the skull’s top part. When the skull is tilted adjust the line midway through the oval to position it at a slight angle. Use straight marks on the oval to show where the eye line, nose and mouth will be positioned.
These base lines let artists locate the features correctly for their drawing to stand firm.Draw the jawbone down from the bottom part of the skull. Connect the lower skull parts to upper regions while paying attention to how the facial base links to the cranium. The vertical line tells you where the nasal cavity should go while maintaining 2-dimensional balance.
The nasal cavity must stand in direct alignment between the eye and mouth lines to produce balanced facial design. Over many sketches I discovered that creating light pencil lines first makes your drawing look natural and organized.
This sketch line system provides you essential details for drawing the skull accurately.Pay attention to where features lie and maintain proper size relationships to give your artwork natural energy. When the skull needs a tilt adjustment use the reference lines to match the scene’s perspective. Holding your pencil steady while matching your facial features correctly helps a skull drawing look exceptional. Creating solid shading and detail needs correct placement of your lined work.
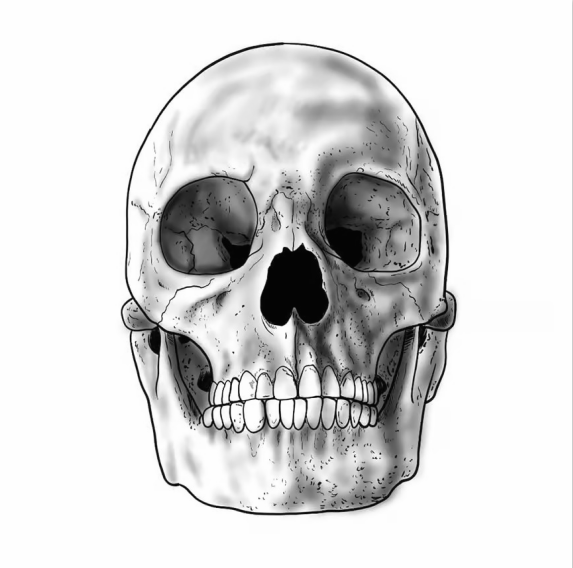
Step 2: Drawing a skull Outline the Eye Pits and Nasal Chambers
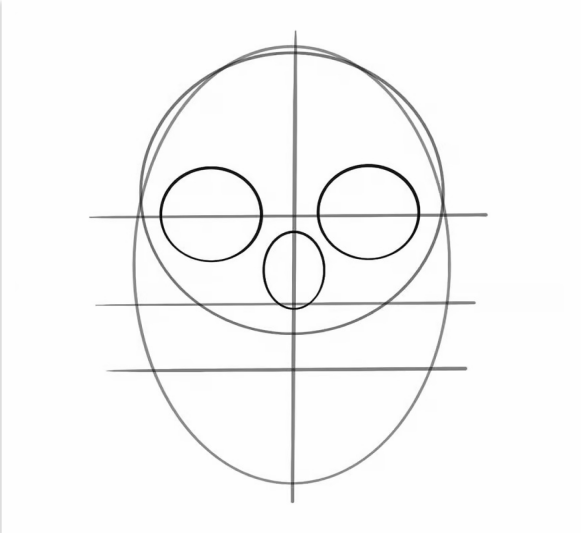
Your first focus as you draw a skull should be the eye sockets and nasal cavity. Start by drawing light lines to show the locations for the features that will be placed along both sides equally. The eye sockets should look like ovals and stand at equal positions between the face sides to stay symmetrical.
Position the nasal cavity as a clear trimmed triangle that appears above the jawbone center. The openings establish fundamental three-dimensional skull features before the realistic appearance develops.Keep watching the relationship between features during their refinement steps. Circulation between the eye sockets nasal cavity and jawbones needs to happen in an easy and lifelike way.
Small irregularities in these sections create natural characteristics so long as they do not affect the symmetrical design. Your brush strokes need to maintain correct skulls human features.Lightly adding shading to the space around each opening helps make the drawing appear three-dimensional well.
Through shading you will create deeper perception of the eye sockets and nasal system to make your drawing more real. These distinct features exist to show us how the real bone surface meets at its transitions and develops irregularities. When you concentrate your drawing efforts on these areas you will create a better and more realistic image.
Step 3: Describe the Bone Structure of the Cheeks and Jaw
Skulls look most interesting to draw when you study their cheekbones and jaw shape. These areas help build distinct personality into the design while making it look authentic. Study how the bone areas naturally move from one to another when you look at the skeleton.
The areas around both eye sockets and temple form major reference points. You can see the cheekbones pushing outwards on either side of the face which creates definition and the lower jaw maintains smooth transitions towards the chin.Enhance the bone structure by adjusting the shape changes between the jawline and cheekbone areas. Look at how bone shape makes distinct edge points and relaxed contours throughout the facial bones.
The jawline shows its unique angle at the ear base that turns smooth as it moves toward the chin. You achieve good skull anatomy by tracing adjusted bone lines gently across the mapped facial areas.According to my knowledge Drawing a Skull: A step by step guide beginning with simple outline sketches enhances my results. Slowly build up depth using the sketch tool in both eye socket spaces and visible bone segments. By adding depth to these areas you will create more realistic shapes in the skull which creates better bone structure in your art.
When you understand the natural organic structure this step creates it improves your artwork quality.
Step 4: Draw specific details into the skull area above and on the teeth
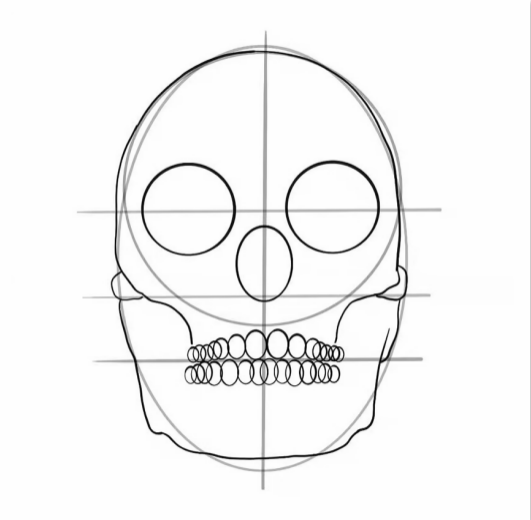
Skull detail development creates a major pleasure for artists as they personalize their work. First concentrate on the contour lines to transform the temple and cheekbone shape. These parts construct the unique head shape of the skull. The shape of the jaw needs your priority because it builds real visual results.
Apply gentle shading to show the centerline which helps place and align facial features. To achieve realistic results you need to pay attention to how the shapes and sizes will work together.Study how teeth appear unique when you reach this area in your work. The teeth in front of the mouth typically stay regular but adjacent teeth display distinct forms and different sizes. The irregular design of teeth makes the drawing look real and avoids artificial appearance.
Skip smoothing too much and instead highlight light natural surface flaws in your artwork. My effective technique starts with drawing the center section followed by extending toward both sides which produces a balanced result. Note how bugs and overlapping elements between teeth help make the entire drawing look realistic.
Review the skull model once more to verify jawline shape matches cheekbone placement and symmetry with the temple area as well as tooth position. The smallest changes to details make a vital difference in achieving realism for your drawing. Effective results depend on your ability to observe tiny shape lines and color changes as you create the skull’s appearance.
Step 5: Learn to Shade Objects and Create Dimensions
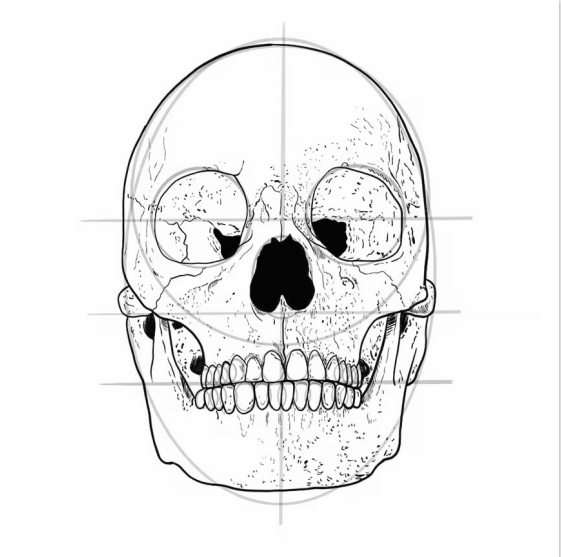
As you shade your skull artwork it becomes alive for the first time. Creating realistic three-dimensional shape helps us reproduce how the skull’s true anatomy looks. Start by spotting where light enters the scene because you will use this information to draw shadows throughout your artwork.
Give special attention to shading the eye sockets nasal cavity and cheekbones because their internal spaces make deep shadows form naturally.Vary your stroke pressure to show the natural shapes and surfaces of the skull. Shadow intensity determines what features we accentuate—the easy-to-grasp shapes have soft shadows but deep sets and nose holes require bold dark shadows.
When coloring use careful mixtures to create natural looking depth that avoids being too dark. Through personal study I learned that you must observe both your cheekbones towords and how light moves across shadows to achieve a symmetrical appearance.
As you step up your drawing skills think about how light rays wash across surfaces to add dimensions. When top left lighting points shine down it throws shadows the bottom right area for an artistic effect. Apply pale colors to display lighting spots and place darker marks into drawn crevices for the effect of contrast. Light positioning together with shadow placing creates visual magic in this drawing.
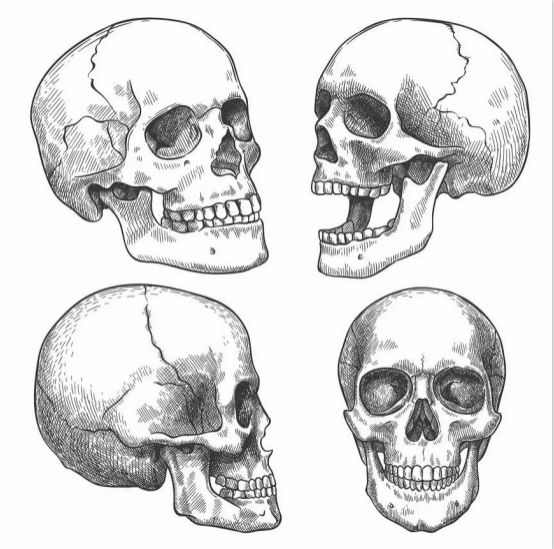
Step 6: Explore different perspectives
You need to study how skull looks different when viewed from different angles. Drawing a skull demands complete understanding of its essential structures and their organization as a system. The spine supports skull placement when seen from different views.
Practicing the fundamental angles of front, side and three-quarters view helps students see essential skull structures during their studies. Looking at facial angles from different perspectives helps you spot basic form elements like lines and shapes while making dependable profile views.Working with reference photos, physical skull models or real-life examples helps you become better at this skill. Watch how elements you tend to overlook affect the skull connection between jaw and skull base plus spine curves as you learn with these learning tools. Watching these small details improves how your artwork looks like actual life.
Change your perspective by rotating a model to learn all possible skull positions in motion. Drawing practice from diverse viewpoints will develop your drawing skills while you learn more about skull anatomy’s real complexity.Keep watching as the shadows and light patterns change across various skull views during your study. By understanding how things change their sizes and positions you will get better at drawing and your work will look more true to life. My drawing skills advanced when I dedicated time to both draw and study the skull’s internal framework. The practice of watching and studying where elements go adds advanced skills that shift your artwork to more accurate and artistic results.
Conclusion: Drawing a skull
Drawing a Skull: A step by step guide holds deep interest whether you do it for scientific study or artwork. To start you need to understand the main shape and line structure of the skull. Begin your work by separating the skull into displays of three positions such as front, side and diagonal views. Each viewpoint shows us how different parts of the skull interact with the spine which exposes a natural curve in its foundation.
Physical models and photo references make this learning task easier. These instruments present visual data that lets people develop skills in recognizing sizes and positions so they can improve how they draw and look at details.During your sketch work create distinct lines to show shapes before applying shading to reveal details and create depth in your drawings. Examine how light hits profile drawings and how shadows develop on the base while drawing skulls. Practicing the movement of perspective from view to view builds your skills to draw life-like compositions. Repetitive exercises paired with focused attention at tiny parts will teach you this universal drawing skill.
Watching your progress in skull studies helps you recognize artistry developing through this process. You can apply this knowledge beyond traditional learning to build your artistic ventures at once. Doing a skull drawing means more than reproducing the physical lines; it means detecting its unique characteristics. Your art will improve when you train often while working with suitable reference material. You gain artist skills by practicing with your sketches and studying the relationships of line, shadow, and structure in the world.